3.23.2012

A Tisket a Tasket a Nifty Auction Basket

When I was little sending a kid to public school was relatively effortless.

Your parents signed you up.  You went.  The end.

Nowadays things are a bit more complicated.  You see, we live in California, and in case you hadn't heard, our schools are in a bit of trouble.

Now this is the part where I stop and tell you how awesome my kids' school is.  Truly, it is an amazing place.  In fact, their school (and the school system in which it exists) are the primary reason we moved to our neighborhood.

One of the things that makes it so amazing is the dedicated school community (teachers, administration & parents) who regularly step up to fill in the gaps that result from state budget cuts.  One way this is accomplished is via the "Foundation," an organization whose primary objective is to provide financial support to enhance curriculum (specifically in the areas of technology, art, music and science). 


The Foundation holds fundraisers throughout the school year but the biggie is a gala/auction held every spring.  Auction baskets for this event are donated by every classroom.  Room moms are in charge of this effort.  (Have I mentioned that I'm a room mom?  Are you surprised?)

Each class does things a little differently.  Some room moms collect money for the basket at the beginning of the year.  That way the other parents don't need to worry about the basket beyond a $5 donation in September.

Other classes come up with a theme and have parents donate items relating to that theme for inclusion in the basket.  I've done it both ways.  This time around my co-room mom and I decided to ask for the money up front so we didn't need to go back to the parents for another donation in the spring.

We decided to do a Trader Joe's basket.  We had $110 in donations.  The end result was actually three Trader Joe's baskets.  I'm going to show you what we made and how we made them.

Most of our money went towards dry goods from Trader Joe's.  It was obvious that we were going to get more than one basket out of our money so we decided to do one "Italian" basket and another "TJ's Sampler" basket.

Here's what we included in the Italian basket:
From l-r: Italian wine, pesto sauce, Italian blood orange sparkling soda, salami, two kinds of organic pasta, Puttanesca sauce, Paresan crisps, Italian olive oil, Balsamic vinegar, Chocolate almond Biscotti & Bruschetta sauce.  

 Confession:  the Italian "basket" isn't really a basket.  Instead we put all of the items in a reusable TJ's tote.  It's not technically an "Italian" bag but the colors have a warm, Tuscan feel.


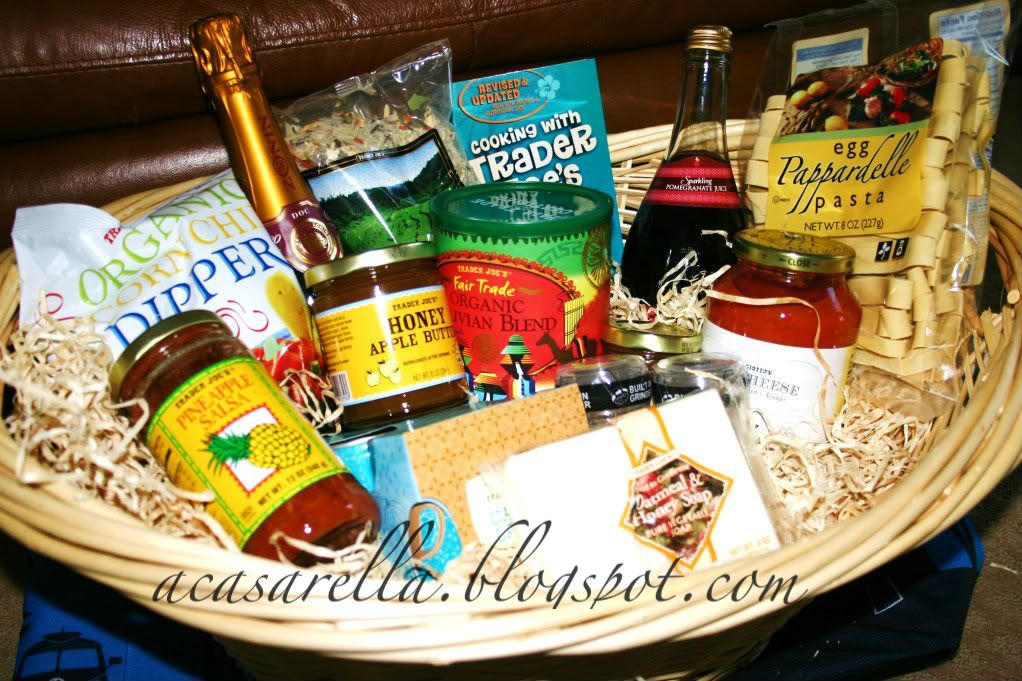
Basket number two actually ended up being numbers two and three.  Here's what they included:

Prosecco and Pomegranate Sparkling Soda

Chutney, Three Cheese Pasta Sauce, Pineapple Salsa & Honey Apple Butter

Himalayan Pink Salt Crystals & "Everyday Seasoning" (both with built-in grinders)

Calimyrna Figs and Chocolate Orange Sticks

Dark Chocolate Crisps (Chocolate covered potato chips!!)

Bistro Biscuits

Organic Corn Chips and a Basmati Rice Medley

Pappardelle Pasta (pictured with the aforementioned sauce)

Cans of Caffe Latte, Fair Trade Bolivian Blend Coffee, English Breakfast Tea & the Bistro Biscuits


Oatmeal & Honey Pure Vegetable Soap
  
Each year I like to make a personal donation to the basket beyond my family's monetary contribution.  This year it was the Cooking with Trader Joe's Companion Cookbook.  I love it because it's just the right size to slip into your purse so you can bring it to TJ's and shop away.  


Our final item was this TJ's oversized, insulated tote.  I have one and I love it!


With the ingredients gathered it was time to assemble the basket.  At this point I had about $5 left in the budget.  I knew that Michael's had these baskets which are often my go-to for auctions.  Originally priced at $9.99, it was on sale for 40% off.  Then my cashier scanned an additional 40% off coupon from behind the register.  (I don't think she was supposed to do that but I'm glad she did ;)


I had some of this in my garage, two bags to be precise, probably left over from last year's auction. There are all kinds of things you can use for cushioning in your basket.  I like the free stuff I find in my garage ;)


Spread it in the bottom of the basket, saving some to fill in any gaps.


Then start adding items...


and shifting them around...


...until you're pleased with the arrangement.
 

Now if you're anything like me, most projects have at least one glitch.  In this case it was the fact that my stuff was too heavy to fit in one basket.  I was really afraid the bottom would fall out so I decided to remove some things in order to make a third, smaller basket.  

Fortunately I had this thrifted beauty in the garage.  I found a stack of them at Goodwill awhile back and just knew I'd be able to use them.  (Plus they were in pristine condition.)      


I was out of the natural wood fiber but had plenty of this from Easters-past:


So I picked a few items that seemed to "go" together and made a little "Cafe Basket."  It contains the coffee, the tea, the cans of caffe latte, the Bistro Biscuits and the dark chocolate crisps.

So now I had three auction items, two of which needed to be wrapped.  
(I left the Italian bag as-is.)


Looking at this post, I realize that it's starting to get a bit... lengthy.  I think I'm actually going to break it into two parts and document the wrapping process next time.  

So you can just call this "to be continued...."

(Part two found here.)

SHARE:

3.21.2012

Paging Virginia Woolf


The other day as I was wasting time on Facebook perusing Facebook for blog inspiration, a link to this popped up on my feed.

It was written by the lovely and talented Karianne over at Thistlewood Farm.   (Have you seen her blog?  Seriously, go over there right now and take a look.  Total home décor porn. )

So in her post Karianne gave us a little behind-the-scenes glimpse at Thistlewood Farm.  Specifically she showed us where she blogs.  And as it turns out, she blogs in exactly the same place I blog: the kitchen.  The difference, of course, is that Karianne’s kitchen looks like this and mine, well, let’s just say mine doesn’t.  (Probably explains the difference in our blogs.)

And I have to admit that this is a bit of a sore subject for me, the fact that I blog in the kitchen.  Because it’s not just the blogging I do there.  It’s also the bill paying, the phone call making, the permission slip signing--I think you're starting to get the picture...

Now don’t get me wrong, I *know* how lucky I am.  I mean, this is the view from my kitchen window and I promise you that I’m grateful for it:

Yes, that is a giant inflatable swan in the pool.
She's my Beyonce.
(If you don't understand that reference please click here.  You will not regret it.)

However I find it somewhat ironic that the person who runs the home, the one who spends the most time here, the person whose job title has the word home (as in HOMEmaker) prominently displayed within it, is the one person in the home who lacks a room of her own.  (Every so often I need to get back to my English teacher roots and throw in a literary reference or two.  Just bear with me.)  

Each of my daughters has a bedroom and together they share a playroom.  My husband has an office and, although it’s also a guestroom, he has another office at work and that one is all his. 

I have a spot at the kitchen table. 

My laptop stays there, open and running all day long, and unless I've been uber-productive there’s generally a stack of papers nearby that needs sorting through.  It’s really not very pretty.

So in answer to your question, Karianne (that one about where I blog) well, here it is, warts and all:


It may not be terribly glamorous but it’s all mine.  

(That is until more than five people want to eat at the table.  Then I have to share.  ;)) 


So, I gotta ask:  Where do you blog?
SHARE:

3.18.2012

Berry, Berry Good

A few days I pinned something that needed to be made immediately.  As in, right away.

This is the item in question:


Now do you understand the sense of urgency?  

I thought so.

It was originally pinned from the website of a fancy-pants French chocolatier.  And the pinner implied that it could be made easily.  Insert strawberries in ice cube tray, cover with melted chocolate, freeze. 

That's it.  The instructions were so easy I couldn't afford not to try it.  Plus I had company coming, the perfect excuse to make something so decadent. 

In typical `A Casarella fashion I decided to document the process so the good viewers at home could play along.

Probably the hardest thing about this little project was finding an ice cube tray.  My fridge makes ice and I didn't own a tray.  I picked one up at Bed, Bath & Beyond and I love it because it has a cover (to prevent icky freezer burn).  If you need one (but don't want to change out of your pajamas to get it) I've attached an Amazon link in the footer of the blog.


Because my ice cube tray has narrow slots, I had to slice the berries (instead of inserting them whole as seen above) so I got out my knife and cutting board.


I bought some beautiful organic strawberries but to be honest, they weren't the most flavorful.   


Luckily that wasn't too noticeable once I covered them with roughly a pound of dark chocolate from Trader Joe's.
I'm not kidding either; I used almost this entire bar.  When I bought it I was sure there might be a bit left over.  

(You know... in case mama needed a little something to get her mind right.)

But we'll get back to the chocolate in a sec.

 So I went ahead and cut up the strawberries and put a few pieces in each slot.


 Then I broke up a bunch of the chocolate and melted it in the microwave.  As mentioned above, I ended up using most of the chocolate so I repeated the melting step a few times before I finished.


(Gratuitous molten chocolate shot.)


Then I covered each slot with chocolate.  If I were to do this again, I would probably put a little chocolate under each berry--a chocolate cushion if you will--I think if I'd done that mine probably would have looked a bit more like the original.


 When I was done covering the berries, I gently dropped the container on the counter a few times to even out the chocolate.  


Then I slid on the cover...


And popped them in my (desperate-for-a-cleaning) freezer.


They emerged a few hours later nicely hardened.  

I thought I'd be able to twist and pop them out like ice cubes.

But they wouldn't budge.


Here you can see where I tried (without luck) to chisel one out.


Finally I decided to put the whole tray in a shallow dish of hot water.  (Thankfully, they popped right out afterwards.)


And here's the finished product.


They're not nearly as perfect as the inspiration picture.  (They came out individually as opposed to one big bar, for starters.)


But they sure were tasty!


I'm going to link up over at this party; stop by and checkout all the easy-peasy projects!
SHARE:

3.15.2012

Tag!

...I'm it!  

Megan over at "Our Pinteresting Family" tagged me today in a little game of Q&A.  Before I answer her questions I recommend you pop over to her site.  If you're a Pinterest Junkie like I am you won't be disappointed.  

So here's how it works.  Megan asked eleven questions which I'm going to answer.  I then need come up with eleven new questions and tag someone else.  Let's begin: 

1. What was your first pet?  
  • I actually had two first pets: a pair of goldfish whom I named Trixie and Red.  In hindsight those names made them sound a little bit like working girls...
2. Which season do you prefer and why?
  • Summer, without a doubt.  I love sunshine, long days, and summer fruits.  I also like the freedom of summer vacation.  
3. Where is your favorite place to shop?
  • Dude, I do not know if I can name just one place.  Here are just a few by category.  
    • For groceries: Trader Joe's and Fresh & Easy.  
    • For the house: HomeGoods, Pottery Barn and West Elm.  
    • For one-stop shopping: Target.  
    • For the thrill of the hunt: thrift stores (especially Amvets, Goodwill and The Salvation Army).
4. What do you like to do in your free time?
  • Lately?  I blog.  Or think about blogging.  Beyond that I love to work out, read, go to the movies and get together with friends. 
5. What is your all time favorite TV show?
  • Hmmm...  I really loved Buffy the Vampire Slayer.  That might surprise people but it was an excellent show.  I also loved The Sopranos; that was some quality television (albeit somewhat violent).  If you want to know my favorite network it's HGTV all the way.  
6. Do you like to garden? If no, why?
  • No, because I hate killing innocent plants.   My thumbs are as brown as they come.  
7. What is the biggest splurge purchase you have ever made?
  • Does my house count??  If not I would have to say either our vacation to Maui three years ago or our vacation to Atlantis last summer.  
8. What was your favorite grade in school and why?
  • Probably junior or senior year of high school.   I liked my school and my classes.  I had good teachers and good friends.  I hope my kids are that happy when they're 16.
9. Who do you admire most?
  • Beyond the obvious people like Ghandi and Martin Luther King I would have to say my husband.  He is the hardest working person I know and I do not say that lightly.  He is also just... good.  He has a good heart.  He's an amazing father.  Plus he's really cute.  
10. What can someone tell about you as soon as they visit your blog?
  • Hmmm...  I'd love to hear how other people would answer that.  If I had to guess I'd say that they could figure out my interests (crafting, cooking, etc.).  They'd know I like the color green.  They'd know that I'm...wordy...  
11. If you could name a lipstick color...what would it be called?
  • I have NO idea.  If I come up with something good, I'll revisit this question.
Now the next thing I am supposed to do is tag some other people and come up with eleven new questions.  First the bloggers:  I'm choosing two people I know in real life, my friend Marie over at Cafe Pangaea and my sister-in-law Linda at Stitch Sister.  

Marie's blog is all about her journey into wheat/gluten-free living.  In addition to posting amazing recipes she also shows readers how to embrace the wheat-free lifestyle without giving up the rest of your life ;) 

Besides being a rockstar sister-in-law, Linda is also a mother, wife, accountant and quilter.  Stitch Sister focuses mostly on the quilts but it touches on other topics as well.  (Like my cute nephews.)

Ladies, here are your questions:
  1. How did you come up with your blog name?
  2. Name one thing about yourself that most people would be surprised to learn.
  3. What blogs do you read religiously?
  4. If money were no object, where would you live and why?
  5. What fashion choice do you look back on with regret?  (Bonus points if you post a picture; I wish I could find one of my mall hair circa 1988.)
  6. Post a link to your favorite blog post to date.
  7. What was the first job you ever had?
  8. What song in your music collection would you consider your guiltiest pleasure?
  9. Fill in the blank:  I would die a happy woman if I discovered that ____________ read my blog.  
  10. What is your favorite "tip" to share with other people?  It can be a product you love, a great place to get a bargain, and easy kitchen tip, your favorite book (anything, really).
  11. What don't you know how to do with your blog that you'd love to learn?
Ladies, it is up to you if you'd like to tag other people.  No pressure at all.  (You can use these questions or make up your own.)  And if any of my other readers want to answer these questions on their blogs (and tag others), please feel free to do so.  I'd love to hear what you have to say.  


SHARE:

3.13.2012

Pinspired: Flower Petal Lantern

Early on in my relationship with Pinterest, I spied a craft that I just knew I had to try.

Yes, I did refer to it as a relationship.  Anything this passionate has to be a relationship.  

(Otherwise I'm just a hussy.)

So as I was saying, there was this craft--tissue paper lanterns, seen here and here--and I just knew I had to make one.  Lucky for me I already had a bunch of paper lanterns left over from my mother's wedding.

That would be the wedding I hosted here in my house.  
Remember all those sitcoms in the seventies where someone would get engaged and the next week there would be a wedding in the main character's living room?  

Well, just call me Maude.  Or Alice.  Or Rhoda.   

(I shudder to think how many of you will not get those references.)


So as I was saying, I already had the lantern:


And old faithful (a.k.a. my trusty glue gun):


The one item lacking was a package of tissue paper circles.  I found them on Amazon (I've attached a link under the "products" tab) but before I could order them something else caught my eye:  fabric flower petals.  They're really intended for flower girls but I immediately envisioned them attached to a lantern.
(There's also a link to these in "products.")  


So I got to work:


 First I put a dollop of glue on the top of a petal.


 Then I attached it to the top of the lantern.  (You know it's the top because it has that little metal hook.  If the metal part is flat, like in the image below, turn the lantern over.)


 Then I continued the gluing petals...

...each one slightly overlapping the one before it.


I continued in that fashion...


...until eventually the lantern was covered.
 (To borrow a quote from one of my favorite bloggers, it was easy-peasy!)


Mine now hangs from my daughter's ceiling right next to some store-bought tissue paper pom-poms.  
(And I have a feeling more will be joining them ;)
SHARE:
© 'A Casarella | All rights reserved.
Blogger Template Created by pipdig